kuroの覚え書き

96の個人的覚え書き

Arduino Pro micro その3 ATCG キーボード

さて、1キーのキーボードができたら今度はそれを複数にしていきたいわな。

ということで4キーに拡張してみた。

#include "Keyboard.h"

const int buttonPinA = 6;          // input pin for pushbutton
int previousButtonStateA = HIGH;   // for checking the state of a pushButton
const int buttonPinG = 7;          // input pin for pushbutton
int previousButtonStateG = HIGH;   // for checking the state of a pushButton
const int buttonPinC = 8;          // input pin for pushbutton
int previousButtonStateC = HIGH;   // for checking the state of a pushButton
const int buttonPinT = 9;          // input pin for pushbutton
int previousButtonStateT = HIGH;   // for checking the state of a pushButton


void setup() {
  // make the pushButton pin an input:
  pinMode(buttonPinA, INPUT_PULLUP);
  pinMode(buttonPinT, INPUT_PULLUP);
  pinMode(buttonPinC, INPUT_PULLUP);
  pinMode(buttonPinG, INPUT_PULLUP);
  // initialize control over the keyboard:
  Keyboard.begin();
}

void loop() {
  // read the pushbutton:
  int buttonStateA = digitalRead(buttonPinA);
  // if the button state has changed,
  if ((buttonStateA != previousButtonStateA)
      // and it's currently pressed:
      && (buttonStateA == HIGH)) {
    // type out a message
    Keyboard.print("A");
  }
  // read the pushbutton:
  int buttonStateT = digitalRead(buttonPinT);
  // if the button state has changed,
  if ((buttonStateT != previousButtonStateT)
      // and it's currently pressed:
      && (buttonStateT == HIGH)) {
    // type out a message
    Keyboard.print("T");
      }
  // read the pushbutton:
  int buttonStateC = digitalRead(buttonPinC);
  // if the button state has changed,
  if ((buttonStateC != previousButtonStateC)
      // and it's currently pressed:
      && (buttonStateC == HIGH)) {
    // type out a message
    Keyboard.print("C");
      }
  // read the pushbutton:
  int buttonStateG = digitalRead(buttonPinG);
  // if the button state has changed,
  if ((buttonStateG != previousButtonStateG)
      // and it's currently pressed:
      && (buttonStateG == HIGH)) {
    // type out a message
    Keyboard.print("G");
  }
  // save the current button state for comparison next time:
  previousButtonStateA = buttonStateA;
  previousButtonStateT = buttonStateT;
  previousButtonStateC = buttonStateC;
  previousButtonStateG = buttonStateG;
}

単純に4キー分を並べただけ。

f:id:k-kuro:20200830002441j:plain

キーボード用のスイッチを使ったところ結構チャタリングするのでdelay入れたほうが良さそう。

これで遺伝子のコードは書き放題だね。

Arduino Pro micro その2 ワンボタンキーボード

Arduino Pro microはArduino Leonardoの互換基板で、今回入手したのは更にそのコピー商品である。

このArduinoクローンの特徴としていわゆるArduino UNOなどスタンダードなシリーズがATMegaシリーズのAVRを使っているのと異なり、32U4というUSBインターフェイスを内蔵したチップを使っている。このチップのおかげでLeonardoシリーズはUSBデバイスとPCから認識されるため、自作キーボードクラスターでは自キー用コントローラとして重宝がられているのだ。

今回の目的もまさにそれなのだ。

ということでキーボード入力をまずはテストしてみる。

単純にデジタルピンにタクトスイッチの片足をつなげ、反対の足をGNDにつなぐだけの簡単回路でまずは試す。
デジタルピンをHIGHにしておいてGNDに落ちたらキー入力されたことになる。普通HIGHにするのにプルアップしておくのだが、内蔵抵抗でプルアップしておく便利機能もあるらしい。


f:id:k-kuro:20200829190505j:plain

#include "Keyboard.h"

const int buttonPin = 9;          // input pin for pushbutton
int previousButtonState = HIGH;   // for checking the state of a pushButton
int counter = 0;                  // button push counter

void setup() {
  // make the pushButton pin an input:
  pinMode(buttonPin, INPUT_PULLUP);
  // initialize control over the keyboard:
  Keyboard.begin();
}

void loop() {
  // read the pushbutton:
  int buttonState = digitalRead(buttonPin);
  // if the button state has changed,
  if ((buttonState != previousButtonState)
      // and it's currently pressed:
      && (buttonState == HIGH)) {
    // increment the button counter
    counter++;
    // type out a message
    Keyboard.print("You pressed the button ");
    Keyboard.print(counter);
    Keyboard.println(" times.");
  }
  // save the current button state for comparison next time:
  previousButtonState = buttonState;
}

サクッとサンプルを流用。今回ピンをd9にしたので変えたのはそこだけ。
タクトスイッチを押すたび、文字列とカウンターが入力されるという仕組み。
f:id:k-kuro:20200829190304p:plain

Arduino Pro micro

Arduino Pro micro を入手したのでとりあえずLチカの儀。

オンボードには電源直結のLEDとシリアルのインジケータLEDしか載ってないので、LチカするためにLEDを繋がねばならない。
で、普通Lチカのスケッチは13ピンを使ってるので13ピンがどれか探すと、13ピンが無いことがわかった。
仕方がないので9ピンに書き換えて試したところ、無事成功。
f:id:k-kuro:20200829180301j:plain

// the setup function runs once when you press reset or power the board
void setup() {
  // initialize digital pin LED_BUILTIN as an output.
  pinMode(9, OUTPUT);
}

// the loop function runs over and over again forever
void loop() {
  digitalWrite(9, HIGH);   // turn the LED on (HIGH is the voltage level)
  delay(1000);                       // wait for a second
  digitalWrite(9, LOW);    // turn the LED off by making the voltage LOW
  delay(1000);                       // wait for a second
}

次はスイッチ入力テストだな

しかしこのUSBコネクタは定評通りのヤワさだな。
実運用時にはもうちょっとマシなコネクタを別に用意したほうが良さそうだ。

ImageJのマクロをpythonで動かす

1000枚以上あるようなTIFF画像にImageJで一律の処理を行いたい。
とてもじゃないが手ではやってられないのでマクロを使って自動運転する。

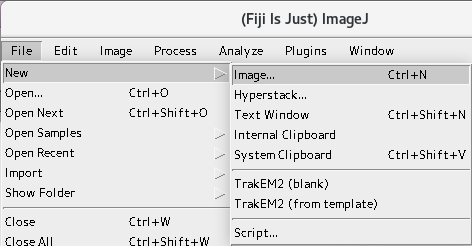
f:id:k-kuro:20200827194949p:plain
File>New>Text Window
を開き、次のようなスクリプトを作成して、Runする。

from ij import IJ
from ij.io import DirectoryChooser
import os


def Analysis(imagepath):
    imp = IJ.openImage(imagepath)
    savefilepath = os.path.join(os.path.dirname(imagepath), "../bc/")
    filename = os.path.basename(imagepath)

    IJ.run(imp, "Median 3D...", "x=3 y=3 z=3") #ノイズを和らげる
    IJ.run(imp, "Enhance Contrast...", "saturated=0.1 normalize") #コントラストをつける
    IJ.saveAs(imp, "Tiff", savefilepath + filename) #出来上がったファイルを保存する
    imp.close()

srcDir = DirectoryChooser("Choose Folder").getDirectory()
IJ.log("directory: " + srcDir)

for root, directories, filenames in os.walk(srcDir):
    for filename in filenames:
        if filename.endswith(".tif"):
            path = os.path.join(root, filename)
            IJ.log(path)
            Analysis(path)

IJ.log("Finish")

ファイルの在処を聞いてくるので指定してやる
それだけ。

Raspberry pi にRTCをつけてネットワークのないところでも時計が狂わないようにする

温度ロガーとかタイムラスプカメラを設置する場所が必ずしもwifiの届くところでない場合、Raspberry Piの時計をちゃんと合わせるのは結構面倒なことだ。特にモニタとかキーボードとか全然使えなくて、本体とカメラのみで運用する場合どうしようもない。そこで、リアルタイムクロック(RTC)を載せてやることにした。

アマゾンで3個1,000円くらいで売られているDS3231と充電池が基板に載っただけのものを手に入れた。

コネクタも付いているのでGPIOに刺すだけでいいようだ。1番ピンに端を合わせて刺す。

www.raspberrypi.org
こちらの情報を元に設定をする。

pi@raspberrypi:~ $ sudo nano /boot/config.txt

dtparam=i2c_arm=on  #コメントアウトされているところを#を外す
dtoverlay=i2c-rtc,ds3231 

再起動

pi@raspberrypi:~ $ sudo hwclock --systohc

とやってシステムの時計をRTCの方に設定する。

pi@raspberrypi:~ $ sudo apt-get purge fake-hwclock

fake-hwclockをアンインストールする。

pi@raspberrypi:~ $ sudo nano /etc/udev/rules.d/85-hwclock.rules

# On the Raspberry Pi the RTC isn't available when systemd tries,
# set the time from RTC now when it is available.
KERNEL=="rtc0", RUN+="/sbin/hwclock --rtc=$root/$name --hctosys"

ファイルを作る。

以上。

pi@raspberrypi:~ $ i2cdetect -y 1
     0  1  2  3  4  5  6  7  8  9  a  b  c  d  e  f
00:          -- -- -- -- -- -- -- -- -- -- -- -- -- 
10: -- -- -- -- -- -- -- -- -- -- -- -- -- -- -- -- 
20: -- -- -- -- -- -- -- -- -- -- -- -- -- -- -- -- 
30: -- -- -- -- -- -- -- -- -- -- -- -- -- -- -- -- 
40: -- -- -- -- -- -- -- -- -- -- -- -- -- -- -- -- 
50: -- -- -- -- -- -- -- -- -- -- -- -- -- -- -- -- 
60: -- -- -- -- -- -- -- -- UU -- -- -- -- -- -- -- 
70: -- -- -- -- -- -- -- --

なおI2Cバスのアドレスを確認するとこんな感じ。

pi@raspberrypi:~ $ sudo hwclock -r
2020-08-26 16:52:26.248377+0900
pi@raspberrypi:~ $ date
2020年 8月 26日 水曜日 16:52:33 JST

ちゃんと設定されている。

ベイジアンネットワーク解析で遺伝子発現の制御関係を網羅的に調べたい

マイクロアレイや、次世代シークエンサーによる発現データセットが大量にあると、すべての遺伝子同士の制御関係(上下関係)が描けるかもしれない。
ということで方法を模索するとネットワーク解析というものに行き着く。ところが、世の中に出ている遺伝子発現関係の論文でネットワーク解析というと大体は共発現ネットワーク(co-expression network)であるらしく、制御関係を示すネットワークではないらしい。
そういう関係性を推論するにはベイジアンネットワーク(bayesian network)解析を行うといいらしい。しかし、どうやらこいつは膨大な計算量になるらしいこともあちこちに書かれている。とりあえず、手元の計算機資源だけで小規模にでも試してみることはできないだろうかと、また、せっかくなのでpythonでライブラリがなかろうかと探してみたところ
Peblというのが見つかった。
pypi.org

ところがこいつは開発がだいぶ前に止まっていて、python3ではインストールさえさせてもらえなかった。

$ python3 -m pip install pebl
Collecting pebl
  Using cached pebl-1.01.tar.gz (2.5 MB)
    ERROR: Command errored out with exit status 1:
     command: /home/linuxbrew/.linuxbrew/opt/python@3.8/bin/python3.8 -c 'import sys, setuptools, tokenize; sys.argv[0] = '"'"'/tmp/pip-install-3u4r784s/pebl/setup.py'"'"'; __file__='"'"'/tmp/pip-install-3u4r784s/pebl/setup.py'"'"';f=getattr(tokenize, '"'"'open'"'"', open)(__file__);code=f.read().replace('"'"'\r\n'"'"', '"'"'\n'"'"');f.close();exec(compile(code, __file__, '"'"'exec'"'"'))' egg_info --egg-base /tmp/pip-pip-egg-info-assg8ojs
         cwd: /tmp/pip-install-3u4r784s/pebl/
    Complete output (6 lines):
    Traceback (most recent call last):
      File "<string>", line 1, in <module>
      File "/tmp/pip-install-3u4r784s/pebl/setup.py", line 38
        except DistutilsPlatformError, x:
                                     ^
    SyntaxError: invalid syntax
    ----------------------------------------
ERROR: Command errored out with exit status 1: python setup.py egg_info Check the logs for full command output.

いちおうpython2環境では使えなくもなさそうなのだけど、MacではSegmentation Fault:11で落ちるとかいろいろ問題がありそうなので、他を当たる。

$ python
Python 2.7.13 (v2.7.13:a06454b1afa1, Dec 17 2016, 12:39:47) 
[GCC 4.2.1 (Apple Inc. build 5666) (dot 3)] on darwin
Type "help", "copyright", "credits" or "license" for more information.
>>> from pebl import data
>>> from pebl.learner import greedy
>>> dataset = data.fromfile("pebl-tutorial-data1.txt")
>>> dataset.discretize()
>>> learner = greedy.GreedyLearner(dataset)
>>> ex1result = learner.run()
Segmentation fault: 11

bayespy
github.com
これは行けそう。とりあえずチュートリアルでもやってみるかね。

import numpy as np
np.random.seed(1)
data = np.random.normal(5, 10, size=(10,))
from bayespy.nodes import GaussianARD, Gamma
mu = GaussianARD(0, 1e-6)
tau = Gamma(1e-6, 1e-6)
y = GaussianARD(mu, tau, plates=(10,))
y.observe(data)
from bayespy.inference import VB
Q = VB(mu, tau, y)
Q.update(repeat=20)
import bayespy.plot as bpplt
bpplt.pyplot.subplot(2, 1, 1)
bpplt.pdf(mu, np.linspace(-10, 20, num=100), color='k', name=r'\mu')
bpplt.pyplot.subplot(2, 1, 2)
bpplt.pdf(tau, np.linspace(1e-6, 0.08, num=100), color='k', name=r'\tau')
bpplt.pyplot.tight_layout()
bpplt.pyplot.show()

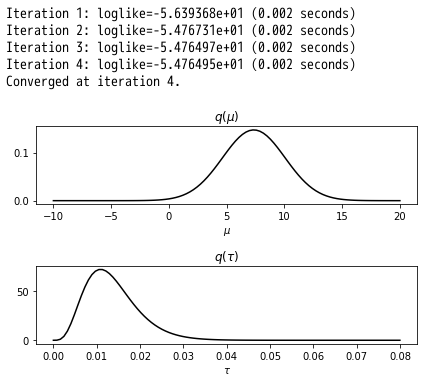
f:id:k-kuro:20200818175006p:plain

さて、これは何なんだろうね?w

なおインストールしたまま実行すると

Traceback (most recent call last):
  File "bay1.py", line 13, in <module>
    Q.update(repeat=20)
  File "/home/linuxbrew/.linuxbrew/Cellar/python@3.8/3.8.5/lib/python3.8/site-packages/bayespy/inference/vmp/vmp.py", line 163, in update
    t = time.clock()
AttributeError: module 'time' has no attribute 'clock'
[rnaseq@mn-rx1330m3 temp]$ nano bay1.py 
[rnaseq@mn-rx1330m3 temp]$ python3 bay1.py 
Traceback (most recent call last):
  File "bay1.py", line 13, in <module>
    Q.update(repeat=20)
  File "/home/linuxbrew/.linuxbrew/Cellar/python@3.8/3.8.5/lib/python3.8/site-packages/bayespy/inference/vmp/vmp.py", line 163, in update
    t = time.clock()
AttributeError: module 'time' has no attribute 'clock'

こういうエラーが出るので
"/home/linuxbrew/.linuxbrew/Cellar/python@3.8/3.8.5/lib/python3.8/site-packages/bayespy/inference/vmp/vmp.py"
の中にあるtime.clock()をすべてtime.process_time()に書き換えてやる(python3.8以上の場合、3.7以下ならエラーは出ないみたい)

コードを読みほぐしてみる

import numpy as np
np.random.seed(1)
data = np.random.normal(5, 10, size=(10,))

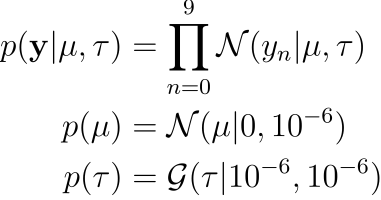
まずNumpyでランダムなデータセットを作成しているな。
Gaussian distribution(正規分布する)平均5、SDが10な10個の数値を生成している。

from bayespy.nodes import GaussianARD, Gamma
mu = GaussianARD(0, 1e-6)
tau = Gamma(1e-6, 1e-6)
y = GaussianARD(mu, tau, plates=(10,))

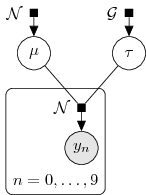
ここでmodelを設定している。平均とSDを推定するモデルね。f:id:k-kuro:20200818181629p:plain
うーむガンマ分布ってなんだったっけ。f:id:k-kuro:20200818182306p:plain

とりあえずbayespy.nodesにいろいろな分布について用意されているので、ここを自分の考えるモデルに合わせて変えてくれってことね。

さあ、モデルができたらそれに当てはめてみるよ。

y.observe(data)

事後分布を推定する。

from bayespy.inference import VB
Q = VB(mu, tau, y)
Q.update(repeat=20)

どうやらここで推論エンジンをつかうのだが、このライブラリではVB(variational Bayesian 変分ベイズ)エンジンしか実装していないようだ。
以下はq(µ)とq(タウ)をグラフにしている。

モデルをどうやってでっち上げるのか、ってところが問題だな。というかこれからネットワークをプロットするのは無理かも。

正規分布しているかの検定

例によってwebアプリ拡張。

統計処理をするにあたって、データが正規分布しているかどうかによってその後の処理が分岐する事が多い。
なので、まずは正規分布かどうかを確定させる必要がある。
Shapiro-Wilk testで判定。Q–Q plot, quantile-quantile plotも参考に。

@app.route('/shapiro', methods=['GET', 'POST'])
def shapiro_index():
    user = g.user.name
    form=StatForm()
    dir = "./user/" + user + "/ttest"
    if os.path.exists(dir):
        shutil.rmtree(dir)
    if not os.path.exists(dir):
        os.makedirs(dir)
    input = dir + "/input.txt"
    output = dir + "/output.txt"

    if request.method == 'POST':
        if 'file' not in request.files:
            flash('No file part')
            return redirect(request.url)
        file = request.files['file']
        if file.filename == '':
            if form.samp_t.data:
                samp = form.samp_t.data.strip()
                f = open(input, 'w')
                f.write(samp)
                f.close()
            else:
                flash('No data input')
                return redirect(request.url)
        if file and allowed_file(file.filename):
            file.save(input)

    if os.path.exists(input):
        if form.data_f.data=='csv':
            df = pd.read_csv(input)
        if form.data_f.data=='tsv':
            df = pd.read_table(input)
        dfs1 = df.iloc[:, form.index_col.data].dropna()
        data = np.array(dfs1.values.tolist())
        header = df.columns
        record = df.values.tolist()
        results = stats.shapiro(data)
        stat_fig = dir + "/stat_" + str(time.time()) + ".png"
        plt.figure(figsize=(5,5))
        stats.probplot(data, dist="norm", plot=plt)
        plt.savefig(stat_fig)
        img_url = "../../static/" + stat_fig

        return render_template('/tools/shapiro.html', form=form, results=results, header=header, record=record, img_url=img_url)

    return render_template('/tools/shapiro.html', form=form)

f:id:k-kuro:20200817195854p:plain
Sepal lengthはこのデータでは微妙に正規分布から外れている(P<0.05)
f:id:k-kuro:20200817200010p:plain
Sepal widthはP>0.05なので正規分布と言えるらしい。

systemctlでvncserver起動

$ sudo cp /lib/systemd/system/vncserver@.service /etc/systemd/system/vncserver@:1.service
$ sudo nano /etc/systemd/system/vncserver@:1.service
[Unit]
Description=Remote desktop service (VNC)
After=syslog.target network.target

[Service]
Type=simple

# Clean any existing files in /tmp/.X11-unix environment
ExecStartPre=/bin/sh -c '/usr/bin/vncserver -kill %i > /dev/null 2>&1 || :'
ExecStart=/usr/bin/vncserver_wrapper <User> %i   #<User>のところを起動するユーザ名に置き換える。
#ExecStart=/usr/sbin/runuser -l ?USER? -c "/usr/bin/vncserver %i -geometry 1366x768 -depth 24"
ExecStop=/bin/sh -c '/usr/bin/vncserver -kill %i > /dev/null 2>&1 || :'

[Install]
WantedBy=multi-user.target

これで取り合えず

$ sudo systemctl daemon-reload
$ sudo systemctl start vncserver@:1.service
$ sudo systemctl enable vncserver@:1.service

とすればvncサーバが起動する。ただしこのままでは1024x768で起動する。
geometryやdepthを変えたければ
/usr/bin/vncserverを書き換えてやる。
(これをするとすべてのユーザの初期設定が変わるので、ユーザごとに変えるには他のやり方が必要なはずだが、知らない。)

#$geometry = "1024x768";
$geometry = "1366x768";
#$depth = 16;
$depth = 24;

SiGN-SSMをソースからコンパイル

Linux版バイナリとして配布されているSiGN-SSMはrel 1.0.2. Multi-thread supported, MPI support not enabledだった。
だからMPIを指定するとマルチスレッドも働かず激遅になったんだな。
あと
You can also use signssm to do this (rel 1.10.0 or later):

$ ~tamada/sign/signssm --ssmperm prefix=perm/result,ssm=result.D008.S001.A.dat,ed=1000,th=0.05 -o final.txt sample.tsv

となっていて1.0.2ではこのコマンドが使えない。まあここはあっという間に終わるのでMacに持っていってからでいいっちゃあいい。
(ところで1.10.0ってそんなバージョンないけど。1.1.0の間違いなんじゃないのかな。1.0.0の可能性もあるけど。)

とにかくコンパイルしてみる。
環境としてBLASLAPACKというライブラリが必要らしい。

$ wget https://github.com/Reference-LAPACK/lapack/archive/v3.9.0.tar.gz

LAPACKをダウンロードする。BLASLAPACKに含まれているらしい。
解凍したらディレクトリに入り

$ cp make.inc.example make.inc
$ make blaslib

そして

$ make lapacklib

でmakeして、出来上がったら

$ sudo cp librefblas.a /usr/lib/libblas.a
$ sudo cp liblapack.a /usr/lib/liblapack.a

とコピーしておく。

一方SiGN-SSMの方は
Makefile

# Prepare "make.inc" for your own environment,
# or comment-out below and uncomment one of the followings.
#include make.inc #ここをコメントアウト

# Linux gcc + Netlib LAPACK. (Set the location of LAPACK in make.inc.gcc_lapack)
include make.inc.gcc_lapack #ここのコメントを外す。

と手を入れ、
make.inc.gcc_lapackの方は

# Netlib LAPACK DIRECTORY
LAPACK=/usr/lib #書き換え
 
# Platform specified in make.inc of LAPACK
#PLAT=_LINUX #コメントアウト

USE_MPI=1 #コメント外し

#########################################################
# NOT NEED TO EDIT BELOW
LAPACK_LIB=$(LAPACK)/liblapack$(PLAT).a  #lapackをliblapackに書き換えた
LAPACK_LIB+=$(LAPACK)/libblas$(PLAT).a #blasをlibblasに書き換えた

としてやって

make

するとsignssmというバイナリが出来上がるので適当な場所にコピーしてやる。
とりあえず

$ bin/signssm -o result1 --threads 8 sample.tsv 
SiGN-SSM  version 1.2.1 (Fri Dec 19 17:15:38 2014 JST)
  Copyright (C) 2010-2014  SiGN Project Members.

! ABSOLUTELY NO WARRANTY.  SEE LICENSE FOR DETAILS.  Visit http://sign.hgc.jp/

Single process mode.
Reading input data file: sample.tsv
Applying mean shift for the input data set.
*******************************
**   Single Execution Mode   **
*******************************
--- INPUT DATA ---------
 observed samples = 21
 objects = 100
 time points = 48
 replicates = 3
------------------------
Max dimension = 4
========================================
= Start the loop for dim=4
Set 1...
Estimation failed.  Retrying (1)...
Estimation failed.  Retrying (2)...
1: Loops=5503, Likelihood=1829.617679
2: Loops=2723, Likelihood=1829.093921
Estimation failed.  Retrying (1)...
3: Loops=4497, Likelihood=1829.805601
4: Loops=2908, Likelihood=1830.622691
5: Loops=28717, Likelihood=1829.705602
6: Loops=14724, Likelihood=1829.985808
・・・・・
95: Loops=2908, Likelihood=1829.762141
96: Loops=4126, Likelihood=1830.554303
97: Loops=4996, Likelihood=1830.595209
98: Loops=2147, Likelihood=1829.749469
Estimation failed.  Retrying (1)...
99: Loops=4746, Likelihood=1829.645741
100: Loops=3037, Likelihood=1829.483204
Finished: dim=4, likelihood=1831.571195
0 day 00 hour 02 min 43 sec
X-SINGLE-TIME:	163.107068

おや?MPIが効いてないどころかマルチスレッドすら動いてない?

ちなみに1.0.2のバイナリで同じ作業をやると

$ bin/signssm0 -o result0 --threads 8 sample.tsv 
SiGN-SSM  version 1.0.2 (Wed Feb 23 11:44:59 2011 JST)
  Copyright (C) 2010  HGC, IMS, The University of Tokyo.

! ABSOLUTELY NO WARRANTY.  SEE LICENSE FOR DETAILS.  Visit http://sign.hgc.jp/

Single process mode.
Reading input data file: sample.tsv
Applying mean shift for the input data set.
*******************************
**   Thread Execution Mode   **
*******************************
Number of threads = 8
--- INPUT DATA ---------
 observed samples = 21
 objects = 100
 time points = 48
 replicates = 3
------------------------
Max dimemsion = 4
Total single tasks = 100
{4} set=1, dim=4, likelihood=1830.679933, loops=198, finished=1
Best likelihood updated for set id = 1.
{6} set=1, dim=4, likelihood=1829.956352, loops=2757, finished=2
{3} set=1, dim=4, likelihood=1830.440368, loops=2997, finished=3
{1} set=1, dim=4, likelihood=1831.018207, loops=3138, finished=4
Best likelihood updated for set id = 1.
{5} set=1, dim=4, likelihood=1829.589914, loops=3391, finished=5
・・・・・
{6} set=1, dim=4, likelihood=1830.725075, loops=4010, finished=96
{0} set=1, dim=4, likelihood=1829.636737, loops=6723, finished=97
{2} set=1, dim=4, likelihood=1829.531546, loops=8539, finished=98
{3} set=1, dim=4, likelihood=1829.669849, loops=33276, finished=99
{5} set=1, dim=4, likelihood=1829.672068, loops=20355, finished=100
Outputting the calculated state variables: result0.D004.S001.K.dat
Outputting the result into a single file: result0.D004.S001.A.dat
Outputting the summary file: result0.D004.S001.B.dat
All time: 0 day 00 hour 01 min 04 sec
X-ALL-TIME:	63.882370

MPIはないけどマルチスレッドが働いていてマアマアの速度。


じゃあと、MPIを外してコンパイルし直してみると

$ bin/signssm2 -o result2 --threads 8 sample.tsv 
SiGN-SSM  version 1.2.1 (Fri Dec 19 17:15:38 2014 JST)
  Copyright (C) 2010-2014  SiGN Project Members.

! ABSOLUTELY NO WARRANTY.  SEE LICENSE FOR DETAILS.  Visit http://sign.hgc.jp/

Single process mode.
Reading input data file: sample.tsv
Applying mean shift for the input data set.
*******************************
**   Single Execution Mode   **
*******************************
--- INPUT DATA ---------
 observed samples = 21
 objects = 100
 time points = 48
 replicates = 3
------------------------
Max dimension = 4
========================================
= Start the loop for dim=4
Set 1...
Estimation failed.  Retrying (1)...
Estimation failed.  Retrying (2)...
1: Loops=5503, Likelihood=1829.617679
2: Loops=2723, Likelihood=1829.093921
Estimation failed.  Retrying (1)...
3: Loops=4497, Likelihood=1829.805601
4: Loops=2908, Likelihood=1830.622691
5: Loops=28717, Likelihood=1829.705602
・・・・・

95: Loops=2908, Likelihood=1829.762141
96: Loops=4126, Likelihood=1830.554303
97: Loops=4996, Likelihood=1830.595209
98: Loops=2147, Likelihood=1829.749469
Estimation failed.  Retrying (1)...
99: Loops=4746, Likelihood=1829.645741
100: Loops=3037, Likelihood=1829.483204
Finished: dim=4, likelihood=1831.571195
0 day 00 hour 02 min 45 sec
X-SINGLE-TIME:	164.772890
Outputting the calculated state variables: result2.D004.S001.K.dat
Outputting the p-values: result2.D004.S001.P.dat
Outputting the meta-analysis of p-values: result2.D004.S001.m.dat
Outputting the result into a single file: result2.D004.S001.A.dat
Outputting the summary file: result2.D004.S001.B.dat
Going to exit.
All time: 0 day 00 hour 02 min 45 sec
X-ALL-TIME:	164.900692

と、やはりマルチスレッドでは動かず、速度も変わらない。
どういうこと?

MPIで走らせるコマンドを忘れていた。

$ mpirun ./bin/signssm1 -o result1 sample.tsv 
SiGN-SSM  version 1.2.1 (Fri Dec 19 17:15:38 2014 JST)
  Copyright (C) 2010-2014  SiGN Project Members.

! ABSOLUTELY NO WARRANTY.  SEE LICENSE FOR DETAILS.  Visit http://sign.hgc.jp/

Single process mode.
Reading input data file: sample.tsv
Applying mean shift for the input data set.
*******************************
**   Single Execution Mode   **
*******************************
--- INPUT DATA ---------
 observed samples = 21
 objects = 100
 time points = 48
 replicates = 3
------------------------
Max dimension = 4
========================================
= Start the loop for dim=4
Set 1...
SiGN-SSM  version 1.2.1 (Fri Dec 19 17:15:38 2014 JST)
  Copyright (C) 2010-2014  SiGN Project Members.

! ABSOLUTELY NO WARRANTY.  SEE LICENSE FOR DETAILS.  Visit http://sign.hgc.jp/

Single process mode.
Reading input data file: sample.tsv
Applying mean shift for the input data set.
*******************************
**   Single Execution Mode   **
*******************************
--- INPUT DATA ---------
 observed samples = 21
 objects = 100
 time points = 48
 replicates = 3
------------------------
Max dimension = 4
SiGN-SSM  version 1.2.1 (Fri Dec 19 17:15:38 2014 JST)
  Copyright (C) 2010-2014  SiGN Project Members.

! ABSOLUTELY NO WARRANTY.  SEE LICENSE FOR DETAILS.  Visit http://sign.hgc.jp/

Single process mode.
Reading input data file: sample.tsv
========================================
= Start the loop for dim=4
Set 1...
Applying mean shift for the input data set.
*******************************
**   Single Execution Mode   **
*******************************
--- INPUT DATA ---------
 observed samples = 21
 objects = 100
 time points = 48
 replicates = 3
------------------------
Max dimension = 4
========================================
= Start the loop for dim=4
Set 1...
Estimation failed.  Retrying (1)...
Estimation failed.  Retrying (2)...
・・・・・

95: Loops=2908, Likelihood=1829.762141
96: Loops=4126, Likelihood=1830.554303
97: Loops=4996, Likelihood=1830.595209
98: Loops=2147, Likelihood=1829.749469
Estimation failed.  Retrying (1)...
99: Loops=4746, Likelihood=1829.645741
100: Loops=3037, Likelihood=1829.483204
Finished: dim=4, likelihood=1831.571195
0 day 00 hour 03 min 47 sec
X-SINGLE-TIME:	226.878186
Outputting the calculated state variables: result1.D004.S001.K.dat
Outputting the p-values: result1.D004.S001.P.dat
Outputting the meta-analysis of p-values: result1.D004.S001.m.dat
Outputting the result into a single file: result1.D004.S001.A.dat
Outputting the summary file: result1.D004.S001.B.dat
Going to exit.
All time: 0 day 00 hour 03 min 47 sec
X-ALL-TIME:	227.000185

いや確かにMPIで走ってはいるが全然速くなってないし。むしろ遅い。

やっぱりこれはMPIで走らせるべきではないソフトウェアなんだろうか。だからバイナリもマルチスレッド対応のみで配布されているのか。自前コンパイルだとそれすらできてないからまるで意味がないな。

しかし1.0.2ではやはり2ステップ目以降の

    • perm
    • ssmperm

オプションはやはり使えないのでLinuxだけで完結しないのでもうちょっとここは頑張ってみるか。

SiGN-SSM

ネットワーク解析がしたいと思い環境構築。結構手こずったので(いつもながら)メモ。

まずはHGCからダウンロード。
MacOSバイナリーとLinuxバイナリーを両方ダウンロードしてみる。

Linux版は解凍して

$ make INSTALLDIR=適当な場所 install

でインストール。ただコピーしてるだけっぽいけど。

$ signssm --threads 8 -n 10 -d 4-12 -o results sample.tsv

というふうにサンプルデータをランしてみる。
チュートリアルにあるようにd=8くらいでBICの値が最小となったので

$ signssm --threads 8 -n 100 -d 8 -o result1 sample.tsv

とやって、できた3つのファイルから次のステップへ進む。

$ sh bin/signssm_plot.sh 3 result1.D008.S001.K.dat sample.tsv output.pdf

とやろうとしたところ、

$ bin/signssm_plot.sh: \u884c 109: gnuplot: コマンドが見つかりません。

と出たので

$ brew install gnuplot
・・・・・・
==> Installing gnuplot dependency: harfbuzz
sh: warning: setlocale: LC_ALL: cannot change locale (C.UTF-8)
==> Patching
==> Applying 7c61caa7384e9c3afa0d9237bf6cd303eb5ef3a1.patch
patching file src/meson.build
Hunk #1 succeeded at 397 with fuzz 1 (offset -8 lines).
Hunk #2 succeeded at 406 (offset -8 lines).
Hunk #3 succeeded at 430 (offset -8 lines).
Hunk #4 succeeded at 532 (offset -8 lines).
Hunk #5 succeeded at 618 (offset -8 lines).
==> meson --prefix=/home/linuxbrew/.linuxbrew/Cellar/harfbuzz/2.7.0 --libdir=/home/linuxbrew/.linuxbrew
==> ninja
Last 15 lines from /home/rnaseq/.cache/Homebrew/Logs/harfbuzz/02.ninja:
       ^
cc1plus: some warnings being treated as errors
[147/289] Compiling C++ object src/test-bimap.p/test-bimap.cc.o
/bin/sh: warning: setlocale: LC_ALL: cannot change locale (C.UTF-8)
[148/289] Compiling C object test/api/test-buffer.p/test-buffer.c.o
/bin/sh: warning: setlocale: LC_ALL: cannot change locale (C.UTF-8)
[149/289] Compiling C++ object src/libharfbuzz-subset.so.0.20700.0.p/hb-subset-plan.cc.o
/bin/sh: warning: setlocale: LC_ALL: cannot change locale (C.UTF-8)
[150/289] Compiling C++ object src/libharfbuzz-subset.so.0.20700.0.p/hb-subset.cc.o
/bin/sh: warning: setlocale: LC_ALL: cannot change locale (C.UTF-8)
ninja: build stopped: subcommand failed.
sh: warning: setlocale: LC_ALL: cannot change locale (C.UTF-8)

READ THIS: https://docs.brew.sh/Troubleshooting

These open issues may also help:
Harfbuzz fails to build on Ubuntu 20.04 (WSL 2) https://github.com/Homebrew/linuxbrew-core/issues/20888

とエラーが大量に出てインストールできないし。
この件についていろいろ試してみたが結局解決せず。

ということで一旦Linuxでの作業を諦め、Macに移る。

$ sh signssm_plot.sh 3 best.D008.S001.K.dat sample.tsv output.pdf
signssm_plot.sh: line 109: gnuplot: command not found

またか。結局おなじなのか?

$ brew install gnuplot
Updating Homebrew...
・・・・
==> Installing gnuplot dependency: python@3.8
==> Pouring python@3.8-3.8.5.mojave.bottle.tar.gz
Error: The `brew link` step did not complete successfully
The formula built, but is not symlinked into /usr/local
Could not symlink bin/2to3
Target /usr/local/bin/2to3
already exists. You may want to remove it:
  rm '/usr/local/bin/2to3'

To force the link and overwrite all conflicting files:
  brew link --overwrite python@3.8

To list all files that would be deleted:
  brew link --overwrite --dry-run python@3.8

Possible conflicting files are:
/usr/local/bin/2to3 -> /Library/Frameworks/Python.framework/Versions/2.7/bin/2to3
/usr/local/bin/idle3 -> /Library/Frameworks/Python.framework/Versions/3.6/bin/idle3
/usr/local/bin/pydoc3 -> /Library/Frameworks/Python.framework/Versions/3.6/bin/pydoc3
/usr/local/bin/python3 -> /Library/Frameworks/Python.framework/Versions/3.6/bin/python3
/usr/local/bin/python3-config -> /Library/Frameworks/Python.framework/Versions/3.6/bin/python3-config
Error: Permission denied @ dir_s_mkdir - /usr/local/Frameworks

またか。その2
エラーメッセージに従って

$ rm '/usr/local/bin/2to3'

としてやると、今度はすんなりとgnuplotがインストールできた。
これでようやく

$ sh signssm_plot.sh 3 result1.D008.S001.K.dat sample.tsv output.pdf

無事完了してPDFファイルが出来上がる。今回100遺伝子のプロファイルなので100枚のPDFなんだけど、これ全ゲノムでやると3万枚のPDFになるんだろうな。見てらんないよ。

で、続いてやることは

then let's try permutation test on the HGC supercomputer system

て、え?ここからはスパコンじゃないとだめなの?


なお、signssmコマンドをMacで走らせようと思ったら

$ ./signssm
dyld: Library not loaded: /usr/local/lib/libmpi.1.dylib
  Referenced from: /Volumes/SSD/kkuro/local/bin/./signssm
  Reason: image not found
Abort trap: 6

とやはりそのままでは動かない。
まずlibmpiがいるということでopen-mpiを入れる。

$ brew install openmpi
$ ./signssm
dyld: Library not loaded: /usr/local/lib/libmpi.1.dylib
  Referenced from: /Volumes/SSD/kkuro/local/bin/./signssm
  Reason: image not found
Abort trap: 6

変わらんし。
強引だけど

$ ln -s /usr/local/Cellar/open-mpi/4.0.4_1/lib/libmpi.40.dylib /usr/local/lib/libmpi.1.dylib
$ ./signssm
dyld: Library not loaded: /usr/local/lib/gcc/x86_64-apple-darwin13.3.0/4.9.0/libgomp.1.dylib
  Referenced from: /Volumes/SSD/kkuro/local/bin/./signssm
  Reason: image not found
Abort trap: 6

なんだとー。

$ mkdir /usr/local/lib/gcc/x86_64-apple-darwin13.3.0
$ mkdir /usr/local/lib/gcc/x86_64-apple-darwin13.3.0/4.9.0/
$ ln -s /usr/local/opt/gcc/lib/gcc/10/libgomp.dylib /usr/local/lib/gcc/x86_64-apple-darwin13.3.0/4.9.0/libgomp.1.dylib

これでどうだ。

o$ ./signssm
SiGN-SSM  version 1.2.1 (Fri Dec 19 17:15:38 2014 JST)
  Copyright (C) 2010-2014  SiGN Project Members.

! ABSOLUTELY NO WARRANTY.  SEE LICENSE FOR DETAILS.  Visit http://sign.hgc.jp/

Single process mode.
Reading input data from the standard input.

signssm(43237,0x10e02b5c0) malloc: can't allocate region
*** mach_vm_map(size=18446603546223603712) failed (error code=3)
signssm(43237,0x10e02b5c0) malloc: *** set a breakpoint in malloc_error_break to debug
[kkuro-Mac-mini-2018:43237] *** Process received signal ***
[kkuro-Mac-mini-2018:43237] Signal: Segmentation fault: 11 (11)
[kkuro-Mac-mini-2018:43237] Signal code: Address not mapped (1)
[kkuro-Mac-mini-2018:43237] Failing at address: 0x0
[kkuro-Mac-mini-2018:43237] [ 0] 0   libsystem_platform.dylib            0x00007fff5cca3b5d _sigtramp + 29
[kkuro-Mac-mini-2018:43237] [ 1] 0   ???                                 0x0000000000000000 0x0 + 0
[kkuro-Mac-mini-2018:43237] [ 2] 0   signssm                             0x0000000103351e26 SSMData_read_fp + 438
[kkuro-Mac-mini-2018:43237] *** End of error message ***
Segmentation fault: 11

とりあえず走るようにはなったみたい。

open-MPIもインストールしたことだし試しにMacで最初からやってみる。

$ mpirun ./signssm -d 8 -n 100 -o result sample.tsv

おっ、結構速いよ。

SiGN-SSM  version 1.2.1 (Fri Dec 19 17:15:38 2014 JST)
  Copyright (C) 2010-2014  SiGN Project Members.

! ABSOLUTELY NO WARRANTY.  SEE LICENSE FOR DETAILS.  Visit http://sign.hgc.jp/

MPI mode: This is the root process.
Reading input data file: sample.tsv
Applying mean shift for the input data set.
Broadcasting the input data.
  Done.
THIS IS THE ROOT PROCESS [SERVER]
In total, 1 (set) x 100 (iteration) x 1 (dimension) = 100 jobs will be dispatched.
Total sets = 1
proc_first_dispatch: rank=1, set_id=1
proc_first_dispatch: rank=2, set_id=1
proc_first_dispatch: rank=3, set_id=1
proc_first_dispatch: rank=4, set_id=1
proc_first_dispatch: rank=5, set_id=1
After the first dispatch: iter=5, set=0, dim_idx=0, set_id=1.
Waiting a job request...
Request received: rank=3, likelihood=1272.128966 (set ID=1)
  Best likelihood updated for set ID=1: 1272.128966 count: 5
Job Dispatched: rank=3, setID1=0, setID2=1, dim=8
  iteration=5, set=0
  6/100

・・・・・

Waiting a job request...
Request received: rank=3, likelihood=2529.649199 (set ID=1)
Job Dispatched: rank=3, setID1=0, setID2=0, dim=-2
  iteration=0, set=0
Waiting a job request...
Request received: rank=4, likelihood=1243.279744 (set ID=1)
------------------------
 Set finished. setID=1.
------------------------
  |set_ranks[recv_id]|=5
  Best likelihood: 1633206613492228683064330596324346188692632137464403681452508477558896480390805133713951290953826731815033386049280101816652249859497132032.000000 @ rank: 2  count: 100
Job Dispatched: rank=4, setID1=-1, setID2=0, dim=-2
  iteration=0, set=0
All jobs finished.  Sending the final order.
For Client:1, num = 0
For Client:2, num = 1
For Client:3, num = 0
For Client:4, num = 0
For Client:5, num = 0
All time: 0 day 00 hour 01 min 49 sec
X-ALL-TIME:	109.028624

ちなみにLinuxXEON E3-1330v6)で7スレッドでやると

All time: 0 day 00 hour 05 min 58 sec
X-ALL-TIME:	357.768202

だったので i7 3.2GHz 6コアのMPIのほうが3倍ほど速いという結果。

$ ./signssm --perm result.D008.S001.A.dat -o perm/result sample.tsv
$ ./signssm --ssmperm prefix=perm/result,ssm=result.D008.S001.A.dat,ed=1000,th=0.05 -o final.txt sample.tsv

と最後までいけた。
signssm --perm
All time: 0 day 00 hour 12 min 26 sec
X-ALL-TIME: 746.334618

signssm --ssmperm
All time: 0 day 00 hour 00 min 00 sec
X-ALL-TIME: 0.267522

かかる時間はこんな感じ。この2ステップはMPIに対応してないっぽく、mpirunでは正しい処理ができなかった。
実際に全ゲノムでやるとなるとこの2番めのステップがボトルネックだろうな。ここはやはりクラスタで並列処理をかましたいところ。

となんかイケてそうな気がしてたけど出来上がったデータを見てみるとどうもMPIはうまく走っていない。うーむ。

なおLinuxのほうでMPIでやってみたらマルチスレッドでやったのと全く同じ結果を得られた。こちらはうまく走っている。
しかしタイムは
All time: 0 day 00 hour 34 min 28 sec
X-ALL-TIME: 2067.862958
とめちゃめちゃかかってる。どういうこと?