kuroの覚え書き

96の個人的覚え書き

Pythonのライブラリアップデート

$ python3 -m pip install --upgrade <ライブラリ>

が基本書式。
インストールしているライブラリを一括でアップデートしたいときは

$ python3 -m pip install pip-review
$ pip-review --auto

とする。
アップデートする前に

$ python3 -m pip freeze > lib.txt

とやってリストを作っておくほうが良い。アップデートして不具合が生じるようなら

$ python3 -m pip install <パッケージ>==<バージョン>

という書式でバージョン指定してインストールし直す。

OSXで改行をまとめて消す。

普通にテキストエディタの置換でやろうとすると1万行とかあると時間がかかって仕方がない。
そこでsedで置換してやりたいのだがOSXsedGNU sedではなくBSD sedなのでお作法が違う。

$ sed -e :loop -e 'N; $!b loop' -e 's/\n/* /g' gene.txt >gene1.txt

こう書くと改行を消してアスタリスクとスペースを付け足してくれる。
1万行でも一瞬で完了。

なおすべての行末に文字を追加する場合

$ echo 'Hello World' | sed -e 's/$/ !!/'
Hello World !!

seqkitでfastaファイルから一部を取り出す

multi fastaファイルから一部の遺伝子だけ取り出したサブfastaファイルを作るには

samtools faidx TAIR10_cDNA.fasta AT1G01010.1 AT1G01020.1 AT1G01030.1 AT1G01040.1 AT1G01050.1 > subset.fasta

のようにsamtoolsを使えばいいのだけれど、fastaファイルがcDNAで遺伝子のリストがtranscript IDではなくてgene IDだったとしたら、これでは抽出できない。
そんなときは

seqkit faidx TAIR10_cDNA.fasta -r AT1G01010* AT1G01020* AT1G01030* AT1G01040* AT1G01050* > subset.fasta

という感じでseqkitを使って正規表現で抽出すると良い。

更に遺伝子のリストがlist.txtなどテキストファイルに列記されているなら。

list=`cat list.txt`
seqkit faidx TAIR10_cDNA.fasta -r $list > subset.fasta

みたいにテキストを読み込んで渡してやる。

さらにさらに、遺伝子のリストが10000遺伝子とかめちゃめちゃ膨大だと引数の文字制限にぶち当たって

Argument list too long

とか文句言われるので、

list=`cat list.txt`
echo "$list" | xargs seqkit faidx TAIR10_cDNA.fa -r  >> subset.fasta

とxargsを使うと良いみたい。

>>ではなくて>でも内容は同じだが、何故か順番は変わってくる模様。

`はバックスラッシュなので注意。

Raspberry pi にarduinoをのっける

Raspberry piにはピンが出ていて、デジタル信号を操作した工作などができるようになっている。ただし、そのピンは基本デジタルであってアナログな信号は直接やり取りできない。アナログ(電圧値など)の入出力をコントロールするならワンチップマイコンの出番なわけだ。ArduinoならばUSB経由でPCと通信できるので、工作するまでもなく、単純にUSBケーブルでつなぐだけでよいのだけれど、それじゃあんまりおもしろくない。てことでワンチップArduinoRaspberry piのピンヘッダに直接乗っけてやろうと言うことになった。

ワンチップと言いながら、シリアル通信をすることもあり、ある程度精度はほしいのでクリスタルとかコンデンサは最低限つなぐためにユニバーサル基板の切れ端でちょっとしたIOボードを作ってやる。猛者は亀の子のような工作をしたりするがAtMegaを使っている時点である程度の大きさはあるため、実用上は意味はない。

Piの1pinが電源なのでこれをAtmagaの7pinに繋ぎ、6pin→8pin (GND)、9pin→10pF→1pin と1Pin→10kΩ→1pinでリセット回路、後は8pin→1kΩ→2pin、10pin→1kΩ→3pinでシリアル通信。クリスタルは9,10ピンに繋いでやる。10pFコンデンサをそれぞれの足からGNDに落として完成。

Raspberry Piには設定>Add/Remove softwareでArduinoを検索して出てくるIDEを入れてやる。

プログラムの書き込みはシリアルポートを設定してやらないとならない。
シリアルポートはRaspbianの標準ではシリアルコンソールに使う設定となっているので、シリアル通信ポートに設定を変えてやっておく必要がある。

$ sudo raspi-config

で5 Interfacing Option→P6 Serial→No→Yes→Ok→Finish
/etc/rc.localの1. Exit 0の前に

/user/bin/gpio mode 0 alt5

と入れて、11pin をRTS信号に割り付けておく。

今回、AtMega168pに前もってArduinoファームウェアをインストール済みだったので、そのまま繋ぐとプログラムは動き出す。
Arduino IDEでシリアルポートを指定して、ボードをArduino Diecimila or Duemilanove w/ ATmega168pを選択する。
これでプログラムコンパイル→書き込みしてやればプログラムを即実行できる。


LM35DZを使った温度ロガープログラムの例

#include <TimeLib.h>
// These constants won't change.  They're used to give names
// to the pins used:
const int analogInPin = A0;  // Analog input pin that the potentiometer is attached to
const int ledPin =  13;      // the number of the LED pin
int sensorValue = 0;        // value read from the pot
int outputValue = 0;        // value output to the PWM (analog out)
int ledState = LOW;             // ledState used to set the LED
long previousMillis = 0;        // will store last time LED was updated
long interval = 10000;
void setup() {
  // initialize serial communications at 9600 bps:
  Serial.begin(9600);
   pinMode(ledPin, OUTPUT); 
}

void loop() {
  unsigned long currentMillis = millis();
  if(currentMillis - previousMillis > interval) {
    previousMillis = currentMillis;
    if (ledState == LOW)
      ledState = HIGH;
    else
      ledState = LOW;
     digitalWrite(ledPin, ledState);
  // read the analog in value:
      sensorValue = analogRead(analogInPin);
      // map it to the range of the analog out:
      outputValue = map(sensorValue, 0, 1023, 0, 330); //3.3V駆動としているので330
      // change the analog out value:
      analogWrite(analogOutPin, outputValue);
    
      // print the results to the serial monitor:
      Serial.print(now());
      Serial.print("\t sensor = " );
      Serial.print(sensorValue);
      Serial.print("\t temp = ");
      Serial.println(outputValue);
    }
}

シリアルコンソールを開くと10秒ごとにアナログポートの値とそれを温度変換した数値が表示されるはずだ。
温度計測と同時にLEDがついたり消えたりするので動作も確認できる。
なお、LM35DZを写真のような基板上にはんだ付けしてしまうとATmegaやRaspberry Piの熱の影響がもろに伝わってしまい、常に30度以上になってしまうので、センサーはツイストケーブルとかを使って本体から離したほうがよさそうだ。

matplotlibで自動的に振られる色が10色しか無い点を変更する

marplotlibは複数の要素をグラフ表示すると、自動的に色を分けてくれるわけだが、これが10色しか用意されていない。まあ実際10本以上折れ線が重なっていたらかなり見にくいことになるのは確かなのだが、それでもたくさんの色で表現したいこともあるわけで。そこでこの色の自動振り当てをどうにかする方法を考えた。

color_codes={3:'#E60012',7:'#F39800',11:'#FFF100',4:'#8FC31F',8:'#009944',12:'#009E96',1:'#00A0E9',5:'#0068B7',9:'#1D2088',2:'#920783',6:'#E4007F',10:'#E5004F',15:'#EB6100',19:'#FCC800',23:'#CFDB00',16:'#22AC38',20:'#009B6B',24:'#00A0C1',13:'#0086D1',17:'#00479D',21:'#601986',14:'#BE0081',18:'#E5006A',22:'#E60033',25:'#848484',0:'#000000'}

まずはこういうカラーチャートに番号を振っておく。番号が順番どおりでないのはグラフに表示させる順番で近い色が隣り合わせにならないように調整したため。

c_code = 0
#と初期化しておいて複数の要素を描かせるためにforループを回す。
for y in q1:
    y0 = [y.data1, y.data2, y.data3]
    y2 = [y.data10,y.data11,y.data12]
    y3 = [y.data13,y.data14,y.data15]
    y5 = [y.data19,y.data20,y.data21]
    y0m = statistics.mean(y0)
    y2m = statistics.mean(y2)
    y3m = statistics.mean(y3)
    y5m = statistics.mean(y5)
    y0d = statistics.stdev(y0)
    y2d = statistics.stdev(y2)
    y3d = statistics.stdev(y3)
    y5d = statistics.stdev(y5)
    c_code1 = c_code % 26
    gcolor = color_codes[c_code1]
#ここでループごとの色指定を行う。26色を用意しているので26で割ったあまりの数値で指定する。27番目で最初の色に戻るわけだ。
    x_ax = np.array([0, 1, 2, 3])
    y_ax = np.array([y0m,y2m,y3m,y5m], dtype=np.float16)
    y_err = np.array([y0d,y2d,y3d,y5d])
    ax.errorbar(x_ax, y_ax, y_err, capsize=3, linestyle=lineStyle, linewidth=lineWidth, color=gcolor, marker=mstyle, markersize=mSize, markeredgewidth=1, label = y.id)
    plt.xticks([0,1,2,3], ['control','1d','3d','7d'], rotation=90, fontsize=tSize, weight='bold')
    ax.legend(bbox_to_anchor=(1, 1), loc='upper left', borderaxespad=1, fontsize=lSize)
    plt.xlabel('samples', fontsize=xSize, weight='bold')
    plt.ylabel('FPKM', fontsize=ySize, weight='bold')
    plt.tick_params(axis='y', which='major', labelsize=ytSize)
    plt.tight_layout()
    plt.subplots_adjust(left=0.15, right=0.6)
    img_data1a = dir + "a_" + str(time.time()) + ".eps"
    plt.savefig(img_data1a)
    canvas = FigureCanvasAgg(fig)
    buf = io.BytesIO()
    canvas.print_png(buf)
    data = buf.getvalue()
    img_data = urllib.parse.quote(data)
#ここまででグラフを描写
    c_code = c_code + 1
#これで色指定をシフトさせる。
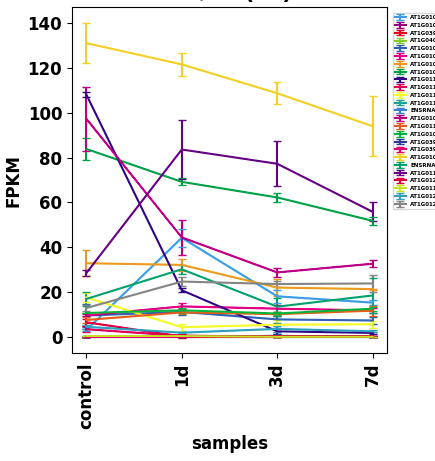
f:id:k-kuro:20200524114847p:plain

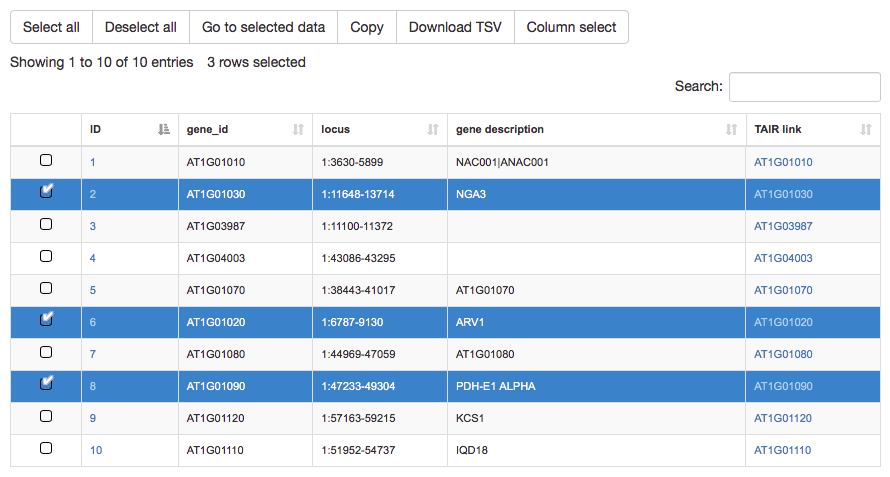
DataTablesの表にチェックボックスをつけて選択した内容から次のアクションを起こす

まず、DataTablesで表をweb上に表示できていることが前提。

いろいろなプラグインがあるのだけれど、ほぼ標準的に使われているButtonsに加え、Selectプラグインも入れておく。

<script type="text/javascript" src="{{ url_for('static', filename='js/datatables.min.js') }}"></script>
<script type="text/javascript" src="{{ url_for('static', filename='js/dataTables.select.min.js') }}"></script>
<script type="text/javascript" src="{{ url_for('static', filename='js/dataTables.buttons.min.js') }}"></script>

説明はコードを見ればわかるだろう。

<script type="text/javascript">
    $(document).ready(function() {
        var events = $('#events');
        var table = $('#result').DataTable({
            "lengthMenu": [[10, 25, 50, 100, -1], [10, 25, 50, 100, "All"]],
            scrollY: 600,
            scrollX: true,
            stateSave: true,
            stateDuration: 0,
            colReorder: true,
            columnDefs: [ {             #この辺がチェックボックスを表示させるコード
                    orderable: false,
                    className: 'select-checkbox',
                    targets:   0             
                } ],
                select: {
                    style:    'multi',           #複数行にチェックを入れる事ができる
                    selector: 'td:first-child',      #一列目にチェックボックスをつける
                    blurable: false,
                },
                order: [[ 1, 'asc' ]],
            buttons: [
                'selectAll',              #全行にまとめてチェック
                'selectNone',            #全行のチェックを外す
                {
                text: 'Go to selected data',      #チェックを入れた行から次のアクションを起こすボタンを作る
                action: function ( e, dt, type, indexes ) {
                    selData = table.rows({selected: true}, indexes).data().toArray();    #チェックを付けた行を集めてjavascriptの2次元配列を作る
                    const transpose = a => a[0].map((_, c) => a.map(r => r[c]));     #ある列の値だけを集めたいので行列入れ替えの関数を作る
                    selData2 = transpose(selData)[34]                 #この場合34列目(チェックボックス除く)の値を集める
                    window.open("/exp_diff/?id="+selData2, '_blanc')          #集めた文字列を引数にデータベースを再検索して表示させる
                    }
                },
                'copy',
                {
                text: 'Download TSV',
                extend: 'csvHtml5',
                fieldSeparator: '\t',
                extension: '.tsv'
                },
                {
                extend: 'colvis',                #カラムを選択するこの機能は廃止されたらしいのだが
                text: 'Column select'
                }
            ],
            dom: 'Biftlp'
          });
  } );
</script>

f:id:k-kuro:20200523175216p:plain

Fujitsu PRIMERGY TX1310M3にCentOSをインストールする

昨年度末にディスコン間近と思われるTX1310M3を購入したっきり、全然時間がなくて放置してあったのだが、ちょっと触ってみる。

まず、これまでのRX200や300とはBIOSUEFIになっている点でかなり勝手が違う。同じUEFIのRX1330M3ともなにやら違っていてこのTX1310M3は特に曲者らしい・・・

色々やってみたがembedded MegaRAID (software RAID)がCentOSでもUbuntuでもうまく使えない。

暇を見つけてやってみたことを並べていくことにする。

買ったままの状態では何もOSが入ってないのでF2を押さなくても勝手にUEFIの画面に入る。
f:id:k-kuro:20200521191421j:plain

AdvancedからLSI Software RAID Configuration Utilityに進む。
f:id:k-kuro:20200521191838j:plain

ここからのRAID設定はややこしいので、
富士通 PRIMERGY TX1310 M3 ソフトウェアRAID設定手順 | PGDブログ
こちら参照で。

ちなみにAdvanced>SATA ConfigurationでAHCIが選択されているとEmbedded RAIDがスキップされ、BIOS上にもメニューが表示されない。
RAIDに変更してリセットするとこのメニューが現れる。

【PRIMERGY】uEFI時のEmbedded SATA RAIDの設定 | OTTOSERVER "TECH" Blog
こちらの説明によると旧BIOSモードに切り替えてからのRAID設定ができないと言っているがそんなことはなく
AdvancedでCSM Configurationをenableにして再起動してやると、起動シークエンスの途中でRAID設定に入ることができるはずだ。

LSIの昔ながらのインターフェースで設定できるので、なれた人ならこちらのほうがやりやすかろう。

さて、RAIDが設定できたら早速インストール。
CentOS8.1なら標準でドライバを持っているらしいという情報を得たので、試しに入れてみようと8.1を探してみると、どうやら8以降はインストーラが片面2層DVD出ないと入り切らないサイズになっているらしい。そんなディスクもない、ということでUSBメモリにネットワークインストーラを入れてやってUSBからのインストールを試してみる。
f:id:k-kuro:20200521193443j:plain
いけそうでいけない。anacondaが起動してインストーラが立ち上がった時点でこのようなエラーが出て止まってしまう。

ネットワークインストールの問題かもしれないので、とりあえず何も考えずにCentOS7のインストーラディスクを装着して起動してみる。
ちなみに今度は色々枯れたちょっと古めのバージョン7.5のディスクでやってみる。

まあ、当然というかインストーラRAIDディスクにアクセスできず、行き詰まる。

次、MEGASR2ドライバを読ませる。
【PRIMERGY】PRIMERGY M3世代へのCentOSインストールについて【CentOS】 | OTTOSERVER "TECH" Blog
ドライバは7.5のものをSDカードに仕込んでおく。

http://azby.fmworld.net/app/customer/driversearch/ia/drviadownload?driverNumber=F1027982

お約束の
インストール項目選択で「e」を押す。
quietを消して

modprobe.blacklist=ahci inst.dd

を追加しctrl + x
でドライバを読ませる。

あれ?ちゃんとインストール出来たよ。
前やったときはどうしてもドライバが動かなかったのに。ドライバのバージョンが上がったか?

RNAmotifのコンパイル(OSX)

config.hは以下のようになっている。

#  Edit the configuration variables below to match your system.  The default
#  values given here should work on GNU/Linux systems.

CC= gcc
CFLAGS= -O2 -Wall

#  Notes: clang can replace gcc above;
#         for icc (version 13.0.1) you need to use -O1 in cflags.

#  The yacc compiler is typically "yacc" (for the *real* yacc), "byacc"
#  (for the Berkeley equivalent) or "bison -y" (to get yacc compatible output 
#  from bison).  Note that /bin/yacc is sometimes a symlink to bison; on
#  such systems you need the -y flag.

#  Note that you need to get version 1.875 or later of bison.  Since this 
#  was released in 2003, that should not be much of a problem....
#  Go to http://www.gnu.org/software/bison/bison.html for more information.

YACC = bison -y

#  The GNU version of lex is called flex.  So the following variable is 
#  either "lex" or "flex", depending upon your system.

LEX = flex

# Uncomment & use these 3 lines to use Genbank in addition to FASTN:

# GBHOME=/home/macke/gensearch
# GBLIB=$(GBHOME)/libgb.a
# CFLAGS=-O2 -DUSE_GENBANK

you may need to locate the C-compiler, lex or yacc, and set compiler
flags.
と説明があったのでbisonをインストールしておく。

$ brew install bison

・・・

bison is keg-only, which means it was not symlinked into /usr/local,
because macOS already provides this software and installing another version in
parallel can cause all kinds of trouble.

If you need to have bison first in your PATH run:
  echo 'export PATH="/usr/local/opt/bison/bin:$PATH"' >> ~/.bash_profile

For compilers to find bison you may need to set:
  export LDFLAGS="-L/usr/local/opt/bison/lib"

言われたとおりPATHを通しておく。

lexもいるようなので

$ brew install flex

・・・

flex is keg-only, which means it was not symlinked into /usr/local,
because macOS already provides this software and installing another version in
parallel can cause all kinds of trouble.

If you need to have flex first in your PATH run:
  echo 'export PATH="/usr/local/opt/flex/bin:$PATH"' >> ~/.bash_profile

For compilers to find flex you may need to set:
  export LDFLAGS="-L/usr/local/opt/flex/lib"
  export CPPFLAGS="-I/usr/local/opt/flex/include"

これまたPATHを通しておく。


さてmakeしてみる。

$ make
cd src; make
gcc -O2 -Wall   -c -o rnamot.o rnamot.c
flex rmlex.l
bison -y -d -v -t rmgrm.y
rmgrm.y: warning: 1 shift/reduce conflict [-Wconflicts-sr]
gcc -O2 -Wall   -c -o compile.o compile.c
gcc -O2 -Wall   -c -o dbutil.o dbutil.c
gcc -O2 -Wall   -c -o dump.o dump.c
gcc -O2 -Wall   -c -o efn.o efn.c
gcc -O2 -Wall   -c -o efn2.o efn2.c
gcc -O2 -Wall   -c -o errormsg.o errormsg.c
gcc -O2 -Wall   -c -o find_motif.o find_motif.c
gcc -O2 -Wall   -c -o getargs.o getargs.c
gcc -O2 -Wall   -c -o log.o log.c
gcc -O2 -Wall   -c -o mm_regexp.o mm_regexp.c
./mk_dumpnode.h.sh y.tab.h > dumpnode.h
gcc -O2 -Wall   -c -o node.o node.c
gcc -O2 -Wall   -c -o preprocessor.o preprocessor.c
gcc -O2 -Wall   -c -o regexp.o regexp.c
regexp.c:344:15: warning: implicit conversion from 'int' to 'char' changes value from 255
      to -1 [-Wconstant-conversion]
                                                *ep++ = 255;
                                                      ~ ^~~
1 warning generated.
gcc -O2 -Wall   -c -o score.o score.c
gcc -O2 -Wall   -c -o split.o split.c
gcc -O2 -Wall   -c -o y.tab.o y.tab.c
y.tab.c:1601:16: warning: implicit declaration of function 'yylex' is invalid in C99
      [-Wimplicit-function-declaration]
      yychar = yylex ();
               ^
y.tab.c:2631:7: warning: implicit declaration of function 'yyerror' is invalid in C99
      [-Wimplicit-function-declaration]
      yyerror (YY_("syntax error"));
      ^
y.tab.c:2742:3: warning: implicit declaration of function 'yyerror' is invalid in C99
      [-Wimplicit-function-declaration]
  yyerror (YY_("memory exhausted"));
  ^
In file included from rmgrm.y:545:
lex.yy.c:1691:17: warning: unused function 'yyunput' [-Wunused-function]
    static void yyunput (int c, char * yy_bp )
                ^
4 warnings generated.
gcc	-O2 -Wall -o rnamotif rnamot.o compile.o dbutil.o dump.o efn.o efn2.o errormsg.o find_motif.o getargs.o log.o mm_regexp.o node.o preprocessor.o regexp.o score.o split.o y.tab.o	  -lm
gcc -O2 -Wall   -c -o rmprune.o rmprune.c
gcc	-O2 -Wall -o rmprune rmprune.o split.o log.o
gcc -O2 -Wall   -c -o rm2ct.o rm2ct.c
gcc	-O2 -Wall -o rm2ct rm2ct.o split.o log.o
gcc -O2 -Wall   -c -o rmfmt.o rmfmt.c
gcc	-O2 -Wall -o rmfmt rmfmt.o split.o log.o
gcc -O2 -Wall   -c -o efn_drv.o efn_drv.c
gcc	-O2 -Wall -o efn_drv efn_drv.o efn.o split.o log.o -lm
gcc -O2 -Wall   -c -o efn2_drv.o efn2_drv.c
gcc	-O2 -Wall -o efn2_drv efn2_drv.o efn2.o split.o log.o -lm 

warningはでたものの、makeはできたらしく、srcディレクトリに色々できている。

testを走らせてみる。

$ make test
cd test; make
=====================================================
Running nanlin test:

nanlin.descr: complete descr length: min/max = 54/58
  PASSED
=====================================================
Running pk1 test:

pk1.descr: complete descr length: min/max = 22/46
  PASSED
=====================================================
Running pk_j1+2 test:

pk_j1+2.descr: complete descr length: min/max = 66/118
  PASSED
=====================================================
Running qu+tr test:

qu+tr.descr: complete descr length: min/max = 45/101
  PASSED
=====================================================
Running score.1 test:

score.1.descr: complete descr length: min/max = 18/24
  PASSED
=====================================================
Running score.2 test:

score.2.descr: complete descr length: min/max = 25/40
  PASSED
=====================================================
Running trna test:

trna.descr: complete descr length: min/max = 63/95
  PASSED
=====================================================
Running mp.ends test:

mp.ends.descr: complete descr length: min/max = 20/24
  PASSED
=====================================================
Running efn test:

・・・

< SEU28SRRNA -21.400 0  152 28 tcaac cgg  .  ggcg g  actg tcct cagt g  cgcc .   ccg cccgc
< TTERRDA    -21.700 0   59 27 cgagt cgc  .  gcgc .  ccgg ggcg ccgg .  gcgc g   gcg cacgg
< MEPMETH    -22.100 0 1234 32 acaat ggga .  tcc  ga cccc gaaa gggg ga  gga aa tccc ctaaa
< MVORR16SY  -22.700 0 1201 32 acaat ggga .  cgc  ga cccc gaaa gggg ga  gcg aa tccc ctaaa
< THCLRRNA   -23.200 0  261 22 ctgaa cc   .  ctc  .  cggg gaaa cccg .   gag .    gg gatgt
< HRTSSRRNA  -24.400 0  667 31 tcttt agtg gt ccgc .  ccc  ttcg  ggg a  gcgg gt cact ggcct
   FAILED (possibly; see if diffs above look OK)

FAILEDで終わった。なにかまずいのか。

echo 'export EFNDATA="/Users/kuro/local/bin/rnamotif-master/efndata"' >> ~/.bash_profile 

これでヨシ。

xgboostのインストール

前回xgboostのインストールがすんなりいかなくて色々回り道をしたが、ちゃんとエラーの内容を紐解けば正しいやり方がわかったろうに、ということでやり直し。

まず、一旦戻ってpip3のところから。

$ pip3 list
WARNING: pip is being invoked by an old script wrapper. This will fail in a future version of pip.
Please see https://github.com/pypa/pip/issues/5599 for advice on fixing the underlying issue.
To avoid this problem you can invoke Python with '-m pip' instead of running pip directly.
Package            Version    
------------------ -----------
abifpy             0.9        
alembic            0.9.5

・・・

WARNING: You are using pip version 20.0.2; however, version 20.1 is available.
You should consider upgrading via the '/Library/Frameworks/Python.framework/Versions/3.6/bin/python3.6 -m pip install --upgrade pip' command.

ここでまずひとつわかることはpipの使い方が

$ pip3 list

というやり方から

$ python3 -m pip list

というやり方に今後は変えますよ、ということ。

あとpipのバージョンが古そうなので

$ python3 -m pip install --upgrade pip

で早速バージョンアップ。

tensorflow==1.14
keras
は正常にインストールできて

$ python3 -m pip install xgboost
Defaulting to user installation because normal site-packages is not writeable
Collecting xgboost
  Downloading xgboost-1.0.2.tar.gz (821 kB)
     |████████████████████████████████| 821 kB 3.8 MB/s 
    ERROR: Command errored out with exit status 1:
     command: /Library/Frameworks/Python.framework/Versions/3.6/bin/python3 -c 'import sys, setuptools, tokenize; sys.argv[0] = '"'"'/private/var/folders/sf/3lk5x37135586w0jgqyjq_yc0000gn/T/pip-install-c294olba/xgboost/setup.py'"'"'; __file__='"'"'/private/var/folders/sf/3lk5x37135586w0jgqyjq_yc0000gn/T/pip-install-c294olba/xgboost/setup.py'"'"';f=getattr(tokenize, '"'"'open'"'"', open)(__file__);code=f.read().replace('"'"'\r\n'"'"', '"'"'\n'"'"');f.close();exec(compile(code, __file__, '"'"'exec'"'"'))' egg_info --egg-base /private/var/folders/sf/3lk5x37135586w0jgqyjq_yc0000gn/T/pip-pip-egg-info-f1lsy3uh
         cwd: /private/var/folders/sf/3lk5x37135586w0jgqyjq_yc0000gn/T/pip-install-c294olba/xgboost/
    Complete output (27 lines):
    ++ pwd
    + oldpath=/private/var/folders/sf/3lk5x37135586w0jgqyjq_yc0000gn/T/pip-install-c294olba/xgboost
    + cd ./xgboost/
    + mkdir -p build
    + cd build
    + cmake ..
    ./xgboost/build-python.sh: line 21: cmake: command not found
    + echo -----------------------------
    -----------------------------
    + echo 'Building multi-thread xgboost failed'
    Building multi-thread xgboost failed
    + echo 'Start to build single-thread xgboost'
    Start to build single-thread xgboost
    + cmake .. -DUSE_OPENMP=0
    ./xgboost/build-python.sh: line 27: cmake: command not found
    Traceback (most recent call last):
      File "<string>", line 1, in <module>
      File "/private/var/folders/sf/3lk5x37135586w0jgqyjq_yc0000gn/T/pip-install-c294olba/xgboost/setup.py", line 42, in <module>
        LIB_PATH = libpath['find_lib_path']()
      File "/private/var/folders/sf/3lk5x37135586w0jgqyjq_yc0000gn/T/pip-install-c294olba/xgboost/xgboost/libpath.py", line 50, in find_lib_path
        'List of candidates:\n' + ('\n'.join(dll_path)))
    XGBoostLibraryNotFound: Cannot find XGBoost Library in the candidate path, did you install compilers and run build.sh in root path?
    List of candidates:
    /private/var/folders/sf/3lk5x37135586w0jgqyjq_yc0000gn/T/pip-install-c294olba/xgboost/xgboost/libxgboost.dylib
    /private/var/folders/sf/3lk5x37135586w0jgqyjq_yc0000gn/T/pip-install-c294olba/xgboost/xgboost/../../lib/libxgboost.dylib
    /private/var/folders/sf/3lk5x37135586w0jgqyjq_yc0000gn/T/pip-install-c294olba/xgboost/xgboost/./lib/libxgboost.dylib
    /Library/Frameworks/Python.framework/Versions/3.6/xgboost/libxgboost.dylib
    ----------------------------------------
ERROR: Command errored out with exit status 1: python setup.py egg_info Check the logs for full command output.

やはりこうなる。

./xgboost/build-python.sh: line 21: cmake: command not found

ここでわかることはcmakeがないよ、ってこと。
なのでcmakeをインストールしてやろうとすると

$ brew install cmake
Error: /usr/local/Cellar is not writable. You should change the
ownership and permissions of /usr/local/Cellar back to your
user account:
  sudo chown -R $(whoami) /usr/local/Cellar
Error: The following directories are not writable by your user:
/usr/local/Cellar
/usr/local/Homebrew
/usr/local/bin
/usr/local/etc
/usr/local/include
/usr/local/lib
/usr/local/opt
/usr/local/share

You should change the ownership of these directories to your user.
  sudo chown -R $(whoami) /usr/local/Cellar /usr/local/Homebrew /usr/local/bin /usr/local/etc /usr/local/include /usr/local/lib /usr/local/opt /usr/local/share

brewがコケる。

$ brew doctor
Please note that these warnings are just used to help the Homebrew maintainers
with debugging if you file an issue. If everything you use Homebrew for is
working fine: please don't worry or file an issue; just ignore this. Thanks!

Warning: The following directories are not writable by your user:
/usr/local/Cellar
/usr/local/Homebrew
/usr/local/bin
/usr/local/etc
/usr/local/include
/usr/local/lib
/usr/local/opt
/usr/local/share

You should change the ownership of these directories to your user.
  sudo chown -R $(whoami) /usr/local/Cellar /usr/local/Homebrew /usr/local/bin /usr/local/etc /usr/local/include /usr/local/lib /usr/local/opt /usr/local/share

Warning: The following directories do not exist:
/usr/local/sbin

You should create these directories and change their ownership to your account.
  sudo mkdir -p /usr/local/sbin
  sudo chown -R $(whoami) /usr/local/sbin

Warning: "config" scripts exist outside your system or Homebrew directories.
`./configure` scripts often look for *-config scripts to determine if
software packages are installed, and what additional flags to use when
compiling and linking.

Having additional scripts in your path can confuse software installed via
Homebrew if the config script overrides a system or Homebrew provided
script of the same name. We found the following "config" scripts:
  /Library/Frameworks/Python.framework/Versions/2.7/bin/python2-config
  /Library/Frameworks/Python.framework/Versions/2.7/bin/python2.7-config
  /Library/Frameworks/Python.framework/Versions/2.7/bin/python-config
  /Library/Frameworks/Python.framework/Versions/3.6/bin/python3.6m-config
  /Library/Frameworks/Python.framework/Versions/3.6/bin/python3-config
  /Library/Frameworks/Python.framework/Versions/3.6/bin/python3.6-config

Warning: Putting non-prefixed coreutils in your path can cause gmp builds to fail.

Warning: Unbrewed dylibs were found in /usr/local/lib.
If you didn't put them there on purpose they could cause problems when
building Homebrew formulae, and may need to be deleted.

Unexpected dylibs:
  /usr/local/lib/libtcl8.6.dylib
  /usr/local/lib/libtk8.6.dylib

Warning: Unbrewed header files were found in /usr/local/include.
If you didn't put them there on purpose they could cause problems when
building Homebrew formulae, and may need to be deleted.

・・・

Warning: Unbrewed .pc files were found in /usr/local/lib/pkgconfig.
If you didn't put them there on purpose they could cause problems when
building Homebrew formulae, and may need to be deleted.

Unexpected .pc files:
  /usr/local/lib/pkgconfig/tcl.pc
  /usr/local/lib/pkgconfig/tk.pc

Warning: Unbrewed static libraries were found in /usr/local/lib.
If you didn't put them there on purpose they could cause problems when
building Homebrew formulae, and may need to be deleted.

Unexpected static libraries:
  /usr/local/lib/libtclstub8.6.a
  /usr/local/lib/libtkstub8.6.a

Warning: You have unlinked kegs in your Cellar
Leaving kegs unlinked can lead to build-trouble and cause brews that depend on
those kegs to fail to run properly once built. Run `brew link` on these:
  texi2html

Warning: /usr/bin occurs before /usr/local/bin
This means that system-provided programs will be used instead of those
provided by Homebrew. The following tools exist at both paths:
  smtpd2.7.py
  idle2.7
  idle
  ctags
  git-receive-pack
  texi2pdf
  2to3-2.7
  etags
  easy_install
  pydoc
  python
  pythonw
  python2.7-config
  pydoc2.7
  git-upload-archive
  pythonw2.7
  emacs
  emacsclient
  texindex
  python-config
  info
  easy_install-2.7
  texi2dvi
  python2.7
  git-cvsserver
  infokey
  git-shell
  git-upload-pack
  smtpd.py
  git
  makeinfo
  install-info

Consider setting your PATH so that /usr/local/bin
occurs before /usr/bin. Here is a one-liner:
  echo 'export PATH="/usr/local/bin:$PATH"' >> ~/.bash_profile

Warning: Your Xcode (8.2.1) is too outdated.
Please update to Xcode 10.1 (or delete it).
Xcode can be updated from the App Store.


Warning: Your Xcode (8.2.1) is outdated.
Please update to Xcode 10.1 (or delete it).
Xcode can be updated from the App Store.


Warning: Broken symlinks were found. Remove them with `brew prune`:
  /usr/local/bin/ctags
  /usr/local/bin/ebrowse
  /usr/local/bin/emacs
  /usr/local/bin/emacsclient
  /usr/local/bin/etags
Warning: Use hdf5 instead of deprecated homebrew/science/hdf5
Warning: Use htslib instead of deprecated homebrew/science/htslib
Warning: Use bowtie2 instead of deprecated homebrew/science/bowtie2

とまあ盛大にWarningが出る。
この中の、最初のWarningの対処を言われたとおりにやる。

$ sudo chown -R $(whoami) /usr/local/Cellar /usr/local/Homebrew /usr/local/bin /usr/local/etc /usr/local/include /usr/local/lib /usr/local/opt /usr/local/share
Password:

するとbrew installがちゃんと使えるようになった。

$ brew install cmake
Updating Homebrew...
==> Downloading https://homebrew.bintray.com/bottles-portable-ruby/portable-ruby-2.6.3.mavericks.bottle.tar.gz
######################################################################## 100.0%
==> Pouring portable-ruby-2.6.3.mavericks.bottle.tar.gz
==> Homebrew has enabled anonymous aggregate formulae and cask analytics.
Read the analytics documentation (and how to opt-out) here:
  https://docs.brew.sh/Analytics
No analytics have been recorded yet (or will be during this `brew` run).

==> Auto-updated Homebrew!
Updated 4 taps (homebrew/core, homebrew/cask, brewsci/bio and brewsci/science).
==> New Formulae

・・・

==> Downloading https://homebrew.bintray.com/bottles/cmake-3.17.2.mojave.bottle.
==> Downloading from https://akamai.bintray.com/ed/edc5ec271841a8b8558f8d60ef510
######################################################################## 100.0%
==> Pouring cmake-3.17.2.mojave.bottle.tar.gz
==> Caveats
Emacs Lisp files have been installed to:
  /usr/local/share/emacs/site-lisp/cmake
==> Summary
🍺  /usr/local/Cellar/cmake/3.17.2: 6,156 files, 58.1MB

ここまでやってやると

$ python3 -m pip install xgboost
Defaulting to user installation because normal site-packages is not writeable
Collecting xgboost
  Using cached xgboost-1.0.2.tar.gz (821 kB)
Requirement already satisfied: numpy in /Library/Frameworks/Python.framework/Versions/3.6/lib/python3.6/site-packages (from xgboost) (1.16.1)
Requirement already satisfied: scipy in /Library/Frameworks/Python.framework/Versions/3.6/lib/python3.6/site-packages (from xgboost) (0.19.1)
Building wheels for collected packages: xgboost
  Building wheel for xgboost (setup.py) ... done
  Created wheel for xgboost: filename=xgboost-1.0.2-cp36-cp36m-macosx_10_14_intel.whl size=3381969 sha256=f8ef36fabe464c9b019fe99671876efa3350dd3c4f275cb5a9b04f717eb0e6d9
  Stored in directory: /Users/kkuro/Library/Caches/pip/wheels/06/0a/03/1dd5317e4ad7882450a41265354839831f7094739ee401043c
Successfully built xgboost
Installing collected packages: xgboost
Successfully installed xgboost-1.0.2

このようにエラーなく、スッキリインストールが完了した。
gccのバージョンアップは不要だったわけだ。


最近のサーバ構成

サーバ   CPU               メモリ            理論性能
RX1330M3 E3-1230v6(4C/8T, 3.50GHz)   DDR4-2400 (PC4-19200E) UDIMM 64GB  224.0GFLOPS
RX300S7  E5-2667(6C/12T, 2.90GHz)x2  DDR3-1600 (PC3L-12800R) LV-RDIMM 32GB 278.4GFLOPS
RX300S7  E5-2643(4C/8T, 3.30GHz)x2  DDR3-1600 (PC3L-12800E) LV-UDIMM 24GB    211.2GFLOPS
RX200S7  E5-2630(6C/12T, 2.30GHz)x2  DDR3-1333 (PC3-10600R) RDIMM 44GB  220.8GFLOPS
RX300S7  E5-2620(6C/12T, 2.00GHz)x2  DDR3-1600 (PC3L-12800R) LV-RDIMM 24GB   192.0GFLOPS

NEC Express5800R110e-1e Pentium G2020 (2C/2T, 2.9GHz)  DDR3-1333 (PC3-10600E) UDIMM 4GB   #ファイルサーバ

E5600(Westmere-EP)は退役し、台数は減ったものの、十分な計算能力は確保していると思う。
各機メモリがもうちょっと欲しいところ。
1CPUあたり64GBくらいないとCufflinksがコケる。

この他TX1310M3も入手してあるが未整備。

ちなみに自宅用には
NEC Express5800T110f-e E3-1220v3(4C/4T, 3.30GHz) DDR3-1600 (PC3L-12800E) LV-UDIMM 8GB

THIRDWAVE R121-340 (CPU/Mem未実装)
がある。